
Setup
- Docker Desktop
- Windows 10 Home
- Visual Studio
Web API Project setup and layout
I wanted to try implementing the API following the Clean Architecture approach, and using a repository pattern outlined here (as an aside, I’ve found Milan Jovanović’s videos & newsletters full of great content, no affiliation).
So far the API, Domain, and Persistence projects have been implemented for the purpose of getting the container running, and returning a list of basic ‘Flight’ objects at the endpoint /v1/flights. The Domain and Persistence projects are Class Library (DLL) projects, and API is a Web API project. API is what actually gets invoked in the container, and references the other two.
As an example, here’s a simple (hard-coded) “flight” created to test the API, at GET /v1/flights:

Creating the API project
- In Visual Studio > New Project > ASP.NET Core Web API. Click Next.
- Fill out a name and location. Click Next.
- Choose a framework (I went with .NET 8.0 just to try out the latest & greatest); disable Configure for HTTPS (we’ll worry about HTTPS termination outside of the container); enable Enable Docker. Click Create.
I followed similar steps to create the Domain and Persistence projects, but choosing Class Library as the output type (this will be relevant when looking at the Dockerfile steps).
Dockerfile
This is where I landed with the Dockerfile (steps explained below, full file at the end):
1
2
FROM mcr.microsoft.com/dotnet/sdk:8.0 AS build
WORKDIR /app
Pull down the dotnet SDK image, and set the WORKDIR to /app. The workdir is the location in the image that subsequent commands are run from.
1
2
3
4
5
6
COPY ["api/API.csproj", "api/"]
COPY ["Domain/Domain.csproj", "Domain/"]
COPY ["Persistence/Persistence.csproj", "Peristence/"]
RUN dotnet restore "api/API.csproj"
RUN dotnet restore "Domain/Domain.csproj"
RUN dotnet restore "Peristence/Persistence.csproj"
Copy the three .csproj files and run the dotnet restore command for each. The reason for copy just the .csproj files (rather than the all the files, which we’ll do later) is related to layers in Docker. Each step is cached, so that means if one of the restore steps fails, we haven’t wasted a bunch of time copying all of the files over. However, if these restore steps pass then this gets cached. Essentially this means if a step later on fails, Docker’s smart enough to say “hey - all those copy .csproj and dotnet restore steps passed, we don’t need to do that again”.
1
2
COPY . .
RUN dotnet publish "api/API.csproj" -c Release -o out
Copy the rest of the files over and publish the build to a directory called out.
1
2
3
FROM mcr.microsoft.com/dotnet/aspnet:8.0 AS runtime
WORKDIR /app
COPY --from=build /app/out ./
Cool, now we’re done with the build, we want to set up the container image that we actually want to use for running the app, in this case dotnet/aspnet:8.0. This is a stripped down container that doesn’t contain the build tools we used above – just an environment for running the app (and not much more, not evening ping, curl, etc). Then switch into the /app workdir (same as above), and copy the output from the build we just did.
1
2
3
ENV ASPNETCORE_URLS=http://+:8080
EXPOSE 8080
ENTRYPOINT ["dotnet", "API.dll"]
Finally, ASPNETCORE_URLS tells dotnet to run on port 8080, which EXPOSE makes available from the container to the outside world. The last thing is to tell docker what to run when the container starts up, which is given by the ENTRYPOINT command.
Full Dockerfile
1
2
3
4
5
6
7
8
9
10
11
12
13
14
15
16
17
18
19
20
21
FROM mcr.microsoft.com/dotnet/sdk:8.0 AS build
WORKDIR /app

COPY ["api/API.csproj", "api/"]
COPY ["Domain/Domain.csproj", "Domain/"]
COPY ["Persistence/Persistence.csproj", "Peristence/"]
RUN dotnet restore "api/API.csproj"
RUN dotnet restore "Domain/Domain.csproj"
RUN dotnet restore "Peristence/Persistence.csproj"

COPY . .
RUN dotnet publish "api/API.csproj" -c Release -o out

FROM mcr.microsoft.com/dotnet/aspnet:8.0 AS runtime
WORKDIR /app
COPY --from=build /app/out ./

ENV ASPNETCORE_URLS=http://+:8080
EXPOSE 8080
ENTRYPOINT ["dotnet", "API.dll"]
Building the image
Now we need to build the image, and then run the container so we can access the app.
One of the important parts here that I got a little stumped on, is that we need to run docker build from within the API project, because that’s where the Dockerfile is. However, because we have references to projects up one level, we need to set the directory for the command to be up a level, ie. ../.
The project structure looks like this:
1
2
3
4
5
src
|- API
   |- Dockerfile
|- Domain
|- Persistence
So, to build the image (assuming Docker’s installed), we can run:
1
docker build -t api -f Dockerfile ../
-t api- tags the image as “api”-f Dockerfile- tellsdocker buildto use the Dockerfile specified at this path (in this case the current API directory)../- run the command from a directory up
If the build succeeds, run docker images in the terminal to see the newly created image.
Running the container
In a terminal, run this to start the container (assuming the container’s named api as above)
1
docker run -p 8080:8080 api
-p 8080:8080- forwards port 8080 on the host, to port 8080 in the container (which we configured above in our Dockerfile). This lets you browse tohttp://localhost:8080and hit the API running in the container. As an example, if you wanted to browse tohttp://localhost:9999on your machine (ie. the host), but still running the application on port 8080 inside the container, you could instead specify-p 9999:8080.
IMPORTANT (AKA a wee mistake that took me too long to figure out) the port mapping needs to come before the name of the image. Otherwise, although no errors are shown, you won’t be able to connect to the container.
If all this works, you should now be able to browse to http://localhost:8080/{your-api-path} and see your containerized API :)
Swagger
A cool feature baked in to Web API is support for OpenAPI documentation with Swagger, which gives automatic documentation of the API.
By default this only enabled for development builds, which means it isn’t available on the container we just built above, however if you a) run the app in the container in dev mode b) change the swagger settings in Program.cs, or c) run the application directly from Visual Studio (see “Running with IISExpress” below), then Swagger documentation will be available at <your-app-url>/swagger/v1/swagger.json:

Troubleshooting
Running from Visual Studio
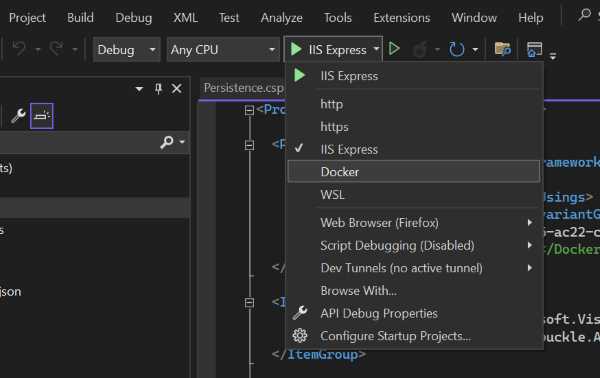
If you chose “Enable Docker” when creating the project, by default Visual Studio will run the application in a Docker container in VS when you hit Run/F5. This is pretty cool, but you might want to troubleshoot without the intermediate layer of the container.
To do this, look for the “Docker” run configuration dropdown in the top toolbar, next to the “Solution Configurations” and “Solution Platforms” dropdowns (usually say “Debug” “Any CPU” by default).
Click the dropdown displaying Docker, and change the setting to IISExpress. Run the project, which should now be running on the default IISExpress ports (see API > Properties > launchSettings.json).
Viewing container information
Docker Desktop has come a long way since the last time I used it. It gives a great overview of container info including logs, stats, output from docker inspect organized by category (eg. network config), bind mounts, and a terminal (Exec) into the container.
I found this particularly useful trying to troubleshoot port mapping, when I noticed the port wasn’t shown as mapped in the Docker Desktop UI.
If you prefer to use the CLI, these commands may be useful:
docker images- view all docker images (and hashes)docker ps- view all running containersdocker inspect <hash>- view configuration information for a containerdocker image rm <hash>- remove a container image (might need--force)
Can’t reach the application via on localhost
Things to check:
- Are you running the Web API application on the correct port? (
ASPNETCORE_URLSenvironment variable, see above) - Has the port been exposed by the container to the outside world? (
EXPOSEin Dockerfile, see above) - Did you specify
-p <host-port>:<container-port>when you calleddocker run? (eg.docker run -p 8080:8080 api)- Did the port come before the container image name?
Next steps
I hope that’s helpful for someone who’s trying to achieve the same, and avoid running into a few of the issues that stumped me.
Now that’s running, the next goal is to get the React/Next web application running and containerize that, ready to get them both running with Kubernetes.